6.7. SD FAT32 启动
SD 卡 FAT32 文件系统启动的整体流程如下:
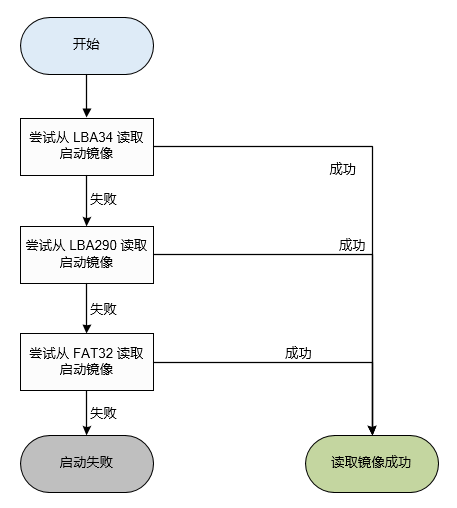
SD 卡启动流程中,首先尝试从分区读取第一级引导程序程序,如果从分区读取和验证失败,则尝试从 FAT32 文件系统启动。要求:
SD 卡必须采用 MBR 分区的方式
第一个分区必须是 FAT32
简单而言,SD 卡使用 Windows 自带的格式化工具进行 FAT32 格式化。
6.7.1. FAT32 中的内容
对于执行升级的使用场景,文件系统中存放的文件如下。
文件 |
是否必要 |
说明 |
|---|---|---|
bootcfg.txt |
必要 |
启动镜像配置文件,名字固定 |
u-boot-spl-updater.aic |
可选 |
BROM 读取和执行的镜像,文件可根据实际情况命名,需配置到 bootcfg.txt |
u-boot-updater.img |
可选 |
SPL 程序读取和执行。根据具体项目的设计来决定是否出现。 |
xxx_v1.0.0.img |
必要 |
U-Boot 读取的升级镜像文件。 |
其中 BROM 只关心 FAT32 文件系统根目录是否出现 bootcfg.txt 以及第一级引导程序,其他文件 BROM 不关心。
使用 bootcfg.txt 配置而不是直接读取镜像文件的原因:
固定名字的配置文件,简化 BROM 寻找启动镜像的逻辑
统一配置入口,BROM 和后续的 SPL、U-Boot 可以方便的找到对应的镜像文件
可以根据不同项目的需要,对具体镜像进行命名
bootcfg.txt 内容示例:
# Boot configuration file
# Used in SD Card FAT32 boot and USB Disk upgrade.
# Format:
# boot0=size@offset
#   boot0 size and location offset in 'image' file, boot rom read it.
# boot0=example.bin
#   boot0 image is file example.bin, boot rom read it.
# boot1=size@offset
#   boot1 size and location offset in 'image' file, boot0 read it.
# boot1=example.bin
#   boot1 image is file example.bin, boot0 read it.
# image=example.img
#   Packed image file is example.img, boot1 use it.

# u-boot-spl-updater.aic
boot0=0x7d80@0x1c00

# u-boot-updater.aic
boot1=0x81d80@0xdc00

image=xxx_v1.0.0.img
使用限制:
文件名必须是 ASCII 字符,不能为 UNICODE 或者其他字符
文件名长度必须是小于128字符
删除所有分区后,对 SD 卡进行深度格式化
SD 卡格式化时,注意簇大小要大于等于 8KB
U-boot-spl.aic 放在 image 中的 offset 位置,必须是 512字节对齐
6.7.2. 启动和升级流程
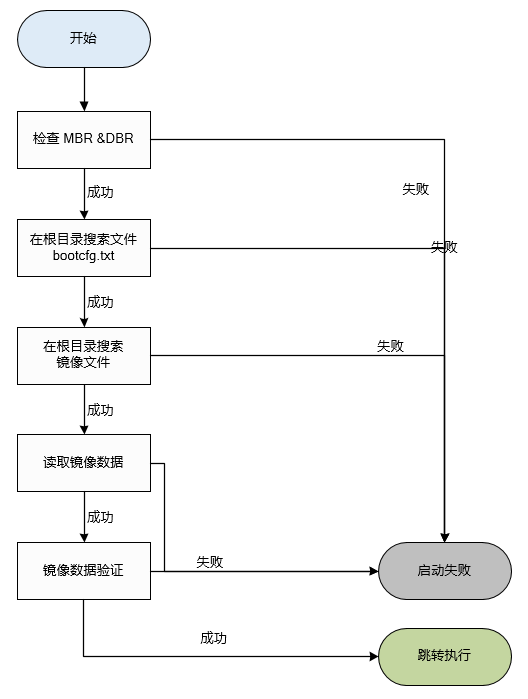
BROM 寻找和启动 FAT32 文件系统中的第一级引导程序的流程如上图所示。
FAT32 启动的设计目的是进行裸机的系统升级,但是 BROM 阶段仅完成找到第一级引导程序并且运行的功能, 后续的升级功能需要在 U-Boot 中进行实现。
